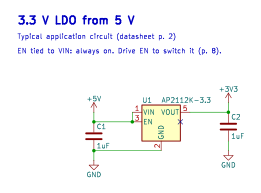
AP2112K-3.3 low-dropout regulator with the 1 µF input and output capacitors from the datasheet's typical application, enabled permanently from the input. Turns a 5 V rail into 3.3 V at up to 600 mA.
DraftPower3 partsApache-2.0
Draft. Nobody has checked this against the datasheet yet. It follows AP2112 600mA CMOS LDO Regulator with Enable, DS39724 Rev. 2-2 (June 2017), KiCad opens it without errors, and the nets match the specification. Check the values yourself before you build it.
The schematic as KiCad draws it. Open it at full size to zoom: it is a vector image.
Pins used on AP2112K-3.3
Pin numbers follow the datasheet's pin table. Every other pin is marked no-connect (X), so you can see what is free; delete the marker to use a pin.
Pin
Name in KiCad
Net
1
VIN
+5V
2
GND
GND
3
EN
+5V
5
VOUT
+3V3
Checklist
Required
Input voltage 2.5 to 6.0 V. The absolute maximum is 6.5 V, so a 5 V rail fits but a 6 V one leaves little margin for spikes. (Diodes Incorporated, p. 3, Recommended Operating Conditions; Absolute Maximum Ratings)
Fit 1 uF at the input and 1 uF at the output, close to the pins. If you use ceramic capacitors, choose X7R or X5R dielectric. (Diodes Incorporated, p. 2, Typical Applications Circuit, Note 4)
Check the heat before you rely on 600 mA. From 5 V to 3.3 V the regulator dissipates 1.7 V times the load current: 0.51 W at 300 mA. The datasheet gives 184 C/W junction to ambient for SOT25 with no heatsink, so 0.51 W is about a 94 C rise. Give the package copper, or use a switching regulator for more than a few hundred mA. (Diodes Incorporated, p. 3, Absolute Maximum Ratings, thermal resistance (the rise is calculated here))
EN logic high (1.5 V or more) turns the regulator on and logic low (0.4 V or less) turns it off. This block ties EN to the input so it is always on; connect EN to a GPIO instead to switch the 3.3 V rail. (Diodes Incorporated, p. 8, AP2112-3.3 Electrical Characteristics, VIH and VIL)
Recommended
If something can already draw current from the output before the regulator is enabled (a second supply feeding the same rail, for example), the foldback current limit may stop it from starting. (Diodes Incorporated, p. 11, Application Note)
Good to know
The AP2112 comes in SOT25, SOT89-5 and SO-8. This block uses SOT25 pin numbers (1 VIN, 2 GND, 3 EN, 5 VOUT) and KiCad's SOT-23-5 footprint; other packages number the pins differently. (Diodes Incorporated, p. 2, Pin Descriptions)
Guaranteed output current is 600 mA minimum, with 250 mV typical dropout at 600 mA. (Diodes Incorporated, p. 1, Features)
PCB layout
3 footprints, 8 tracks and 3 vias, drawn for KiCad and checked with its design rule check and schematic comparison. The block has no board outline: it takes the one of the board you place it on.
The layout as KiCad draws it: front copper red, back copper blue.
Keep the 1 uF input and output capacitors next to the pins they serve. Here C1 is 5 mm and C2 4 mm from U1, with the ground return of both on the back-side copper. (Diodes Incorporated, p. 2, Typical Applications Circuit, Note 4)
Tie the ground pads to a ground pour on the back layer through the three vias, so the capacitors' ground return does not run through the regulator's ground pin. (common practice)
The block has no board outline or ground pour of its own: it takes the project's. Refill zones after placing it. (common practice)
Diodes Incorporated, p. 2, Typical Applications Circuit, CIN; Note 4
C2
1uF
Device:C
Capacitor_SMD:C_0603_1608Metric
Diodes Incorporated, p. 2, Typical Applications Circuit, COUT; Note 4
How to use it
In KiCad 9 or later. Unzip the download. Open Preferences › Manage Design Block Libraries, add the unzipped crossprobe.kicad_blocks folder as a library, then place the block from the design block chooser. The symbols and footprints are KiCad's own.
In Crossprobe. Choose Open in Crossprobe above. It opens a new project with this block already in its schematic, using the reference designators from the table above. The project stays in your browser until you save it, and you pick where it goes. To add the block to a project you already have, open that project, turn on Edit and use Add block.